Showing posts with label Essbase. Show all posts

Thursday, October 21, 2021

// // 1 comment

Unable to add/connect or expand Essbase server in EAS (Essbase Administration Services) console

Issue:

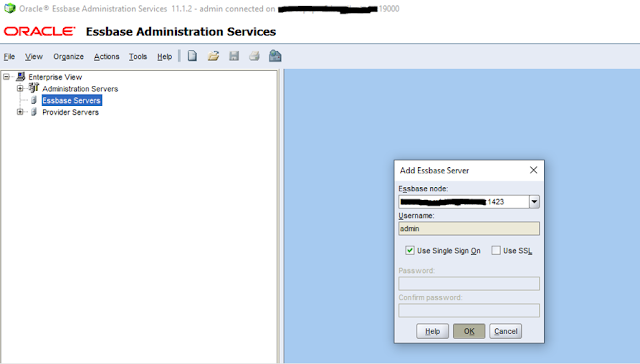
When we try to add/connect a new Essbase server or expand an existing Essbase server in EAS (Essbase Administration Services) console to see applications list etc., it keeps loading/rolling for long time and eventually Essbase server doesn’t get added or expanded being hanged, as shown below:

Adding new Essbase server:

Unable to add/connect or expand Essbase server in EAS (Essbase Administration Services) console

Expanding existing Essbase server:

Unable to add/connect or expand Essbase server in EAS (Essbase Administration Services) console


Investigation:

We check the easserver.log for the timestamp and noticed following error:

Log file path: E:\apps\OracleEPM\Middleware\user_projects\domains\EPMSystem\servers\EssbaseAdminServices0\logs\easserver.log

Error:

[2021-10-18T09:17:26.196-06:00] [EssbaseAdminServices0] [ERROR] [ESSEAS-24206] [oracle.epm.essbase.eas] [tid: 18] [userId: <anonymous>] [ecid: 00jBJTZ37vAB1FwDwFj8CW0002es0000Zt,0:1:4] [APP: EAS#11.1.2.0] Failed to handle request for com.essbase.eas.essbase.defs.ServerCommands.Connect. See below stack trace for more information. Possible cause for this exception is missing java archive for this request to handle. Check application server WEB-INF/lib folder or CLASSPATH, if the required java archive file is available.[[
com.essbase.eas.framework.server.defs.ApplicationException: java.net.SocketException: socket write error: Connection aborted by peer
.....
.....
Caused by: java.net.SocketException: socket write error: Connection aborted by peer


Solution that worked for us:

Note: We have Essbase component installed on Linux server and EAS service installed on Windows 20212 R2 server.

Error "socket write error: Connection aborted by peer" is usually caused by writing to a connection that had been aborted by the peer before getting the full response. It means that the other side aborted the connection. Since we are facing this error on client side (EAS console), then the Essbase server side must be the one aborting the connection. In most cases this can be caused either by the timeout issue (e.g. the response takes too much time or server is overloaded with the requests), or the client sent the SYN, but it didn't receive ACK (acknowledgment of the connection termination) from the other side.

We first checked with Network team to see if there is any network issue between the source (EAS server) and the target (Essbase server). But they confirmed it was all ok at Network end.

Then we decided to reboot our Essbase Linux server as the connection was getting aborted from that side.

Steps:
  • Stop Essbase and EAS services.
  • Reboot Essbase (Linux) server.
  • Start Essbase service and then EAS service.
  • Login to EAS console and try to add a new Essbase server or expand an existing Essbase server. It worked fine.

That's all for this post.
I hope this article has helped you. Your suggestions/feedback are most welcome.
Keep learning and Have a great day!!!

Share this post:
Read More

Monday, June 14, 2021

// // 1 comment

How to change temporary (temp) directory in Oracle Essbase Server

Recently we got a critical alert where /tmp directory on our Essbase Linux server (Version: 11.1.2.4.033) was utilizing more than 90% of total allocated space. When we checked, there were many temporary Outline(.otl) files created under the /tmp directory. Most of them were of few KBs size but couple of files were really huge-sized of around 2gb each causing this space crunch alert under /tmp directory. Below is some of those huge sized .otl files listed:
-rw-r----- 1 epmadmin sapsys 2049736704 May 22 12:39 0oKEzW.otl
-rw-r----- 1 epmadmin sapsys 1370583040 May 22 07:43 MsnP8R.otl
-rw-r----- 1 epmadmin sapsys 2049994752 May 22 12:53 spQfrr.otl
-rw-r----- 1 epmadmin sapsys 1360232448 May 22 07:43 wpWopg.otl
Temp directory mostly contains files that are required temporarily. Many Essbase activities use this to create lock files and for temporary storage of data. When an Essbase outline is opened, it creates such temp files. Other activities like HPCM application deployment to Essbase and FDMEE data load to Essbase, Metadata load to Essbase etc. also can create these temporary files. 

Usually, Essbase doesn't produce such huge sized temporary files. Mostly you will see the size in KBs only for such temp files. These temporary files are normally deleted automatically when the related operation is over. But on some occasions you will observe they are not automatically deleted.

We noticed that when these huge sized temporary files (around 2gb per file) are created under /tmp directory on Essbase Linux server, it not only causes /tmp directory go out of space with 100% utilization but also the following issues encountered at the same time:
  1. Essbase server gets hanged.
  2. FDMEE data load to Essbase gets failed.
  3. Unable to load Essbase applications in FDMEE 'Target Application' interface.
Apart from the above listed ones, there might be even more problems. All in all, these issues point towards 'Essbase server disconnection' at that particular point of time. 

So in order to fix it, as a temporary workaround, we moved all those huge-sized temporary .otl files from /tmp directory to some other location and it fixed all the issues. You can also delete these temp files, if not required.

In a Windows server, the temporary directory is set by the environment variable TEMP. In UNIX/LINUX server, the temporary directory is /tmp filesystem. As /tmp is a Linux/Unix OS Filesystem, it is not recommended to use OS file system for application usage because it may lead to even server crash if all /tmp space is consumed at any point of time. So the safe way out is to have a separate temp folder assigned for Essbase application usage other than OS /tmp directory.

Workarounds

As mentioned above, instant workaround is to move/delete these temporary files to clear up some space under /tmp directory.

But as a permanent fix, we decided to have a separate temp directory assigned to Essbase application, that we will discuss ahead.

Changing the Default Location for Essbase Temporary Files on Linux Platforms:

On Linux platforms, Essbase uses OS /tmp directory as the default location for creating temporary files.

To create temporary files in a different location, you must set the temp directory environment variable in opmn.xml and in setEnv.sh configuration files.

To set TEMP/TMP environment variable in opmn.xml

1- Find opmn.xml file on your Essbase server located at below path: /apps/oracle/epm/Middleware/user_projects/epmsystem_ess/config/OPMN/opmn/opmn.xml

2- In opmn.xml file, look for the following default entries:
<environment>
<variable id="TEMP" value="/tmp"/>
<variable id="TMP" value="/tmp"/>
</environment>
3- Change the default values of TEMP and TMP variables to your desired location as shown below and save the opmn.xml file :
<environment>
<variable id="TEMP" value="/apps/oracle/epm/Middleware/user_projects/epmsystem_ess/tmp"/>
<variable id="TMP" value="/apps/oracle/epm/Middleware/user_projects/epmsystem_ess/tmp"/>
</environment>

To set TMPDIR in setEnv.sh

1- Find setEnv.sh file on your Essbase server located at below path: /apps/oracle/epm/Middleware/user_projects/epmsystem_ess/bin/setEnv.sh

2- By default there will be no entry set for TEMPDIR in setEnv.sh (means your OS /tmp directory will be used to store temporary files). 
To change the default location, add the following entry at the end of setEnv.sh file and save it:
TEMPDIR="/apps/oracle/epm/Middleware/user_projects/epmsystem_ess/tmp"
export TEMPDIR
Note: You have to restart Essbase services to make these changes effective.

That's all for this post.
I hope this article has helped you. Your suggestions/feedback are most welcome.
Keep learning and Have a great day!!!

Share this post:
Read More

Friday, June 26, 2020

// // 2 comments

Essbase Client MSI (EssbaseClient.exe) installation and version check

Hi Friends,

Topic: How to install Essbase client MSI and check the installed Essbase client version 

Essbase Client MSI (EssbaseClient.exe) is required to be installed when you need to use MaxL or ESSCMD interpreters on the Windows server. Most importantly Essbase Client MSI should be installed on HPCM and FDMEE Windows servers as you may face connection issues between HPCM-Essbase and FDMEE-Essbase, if Essbase Client is not installed on these servers.

When you first time install and configure Hyperion Essbase, EPM System Installer installs both 32-bit and 64-bit Essbase Client on a machine with a 64-bit operating system. EPM System Installer installs only 32-bit Essbase Client on a machine with a 32-bit operating system.

Once you have an already running Hyperion Essbase setup, then to apply the latest patch set update (PSU) released for Essbase, for a 32-bit Windows operating system, download and install the 32-bit version of Essbase Client and for a 64-bit Windows operating system, download and install the 64-bit version of Essbase Client.

In this post, we will see how you can install and uninstall Essbase client MSI on the Windows server and check its version post-installation.

Important Note:
  1. The demonstrating Hyperion environment has the 'Windows Server 2012 R2 Standard' 64-bit operating system. 
  2. This post has been written and associated activities have been demonstrated on Oracle Hyperion Essbase Client MSI  11.1.2.4.021 (Patch 26835581). The latest version of Essbase Client MSI (released till today 26th June 2020) is 11.1.2.4.039 that you can read more about here https://blogs.oracle.com/proactivesupportepm/psu_essbase_11124039 
  3. Caution: The Essbase client version should match the version of the Essbase Server. Oracle recommends using the same version of all Essbase portfolio products (Essbase, Essbase Administration Services, Hyperion Provider Services, and Essbase Studio) and components (server, client, runtime client, API, and JAPI). When only some Essbase portfolio products are included in a patch release, the last released versions of the products that are not included in the patch are supported. For example, Essbase Administration Services 11.1.2.4.037, Provider Services 11.1.2.4.039, and Essbase Studio 11.1.2.4.031 are supported for use with Essbase 11.1.2.4.039.
  4. Refer to the Readme files prior to proceeding with these PSU implementations for important information that includes the supported paths per component, along with a full list of the defects fixed, additional support information, prerequisites, details for applying patch, and troubleshooting FAQ's. It is important to ensure that the requirements and support paths to this patch are met as outlined within the Readme file. 
  5. Before installing the new version of Essbase Client, you first need to uninstall the already installed version of Essbase Client on your Windows server.
How to uninstall Essbase Client MSI (EssbaseClient.exe):

To uninstall the already installed Essbase Client on Windows server:

1.    In Control Panel of the Windows server, navigate to Programs and select 'Uninstall a program'.
2.    Select 'Oracle(R) Hyperion Essbase Client', right-click, and then select Uninstall.

Essbase Client MSI (EssbaseClient.exe) installation and version check

Once you have successfully uninstalled the already running Essbase Client, you can now install your new Essbase Client version.

How to install the new Essbase Client MSI (EssbaseClient.exe):

Note: You can download the required version of Essbase Client from the Oracle Support portal. For example, here we have downloaded the Patch 26835581 which consists of EssbaseClient.exe of version 11.1.2.4.021. After download, extract the zip file to your desired folder. In this case, we have extracted it to OPatch folder E:\apps\OracleEPM\Middleware\EPMSystem11R1\OPatch.
  1. In the extracted folder, right-click on EssbaseClient.exe file and select 'Run as administrator'.
    Essbase Client MSI (EssbaseClient.exe) installation and version check
  2. Select your choice of language.
    Essbase Client MSI (EssbaseClient.exe) installation and version check
  3. Pick a destination folder (make a note of the destination directory). Mostly it's installed under the path E:\apps\OracleEPM\Middleware\EPMSystem11R1\products\Essbase\EssbaseClient\
    Essbase Client MSI (EssbaseClient.exe) installation and version check
  4. You can de-select Essbase Client C API and Essbase Client Samples, if you want to use Essbase Client only for Hyperion applications connections within a Hyperion environment.  #NOTE: Essbase Client C API is used to connect to Essbase server from non-Hyperion application setups like Spotfire server, MicroStrategy products, etc. The API is an interface between your custom client program and Essbase, and manages the transfer of data between client and server. Your program makes calls to functions within the API, and data is returned from the Essbase servers you connect to. You can also run custom programs on the server machine, using the same API functions as on the client. You don't have to be concerned about where the Essbase Server computer is located on the network when writing a custom API program. Locating the server and transferring data is handled by the API.
    Essbase Client MSI (EssbaseClient.exe) installation and version check
  5. Click Install.
    Essbase Client MSI (EssbaseClient.exe) installation and version check
  6. Your installation is completed.
    Essbase Client MSI (EssbaseClient.exe) installation and version check
  7. In the Installed Programs list of the Control Panel, you can find a listing for Oracle(R) Hyperion Essbase Client.
    Essbase Client MSI (EssbaseClient.exe) installation and version check
Note: After applying the Essbase Client patch, you might need to set the ESSLANG environment variable to your local language, if not already done. Also set the library path and PATH environment variables to point to the Essbase client bin directory, if not already done.

How to verify the installed version of Essbase Client on the Windows server:

Method-1:
  1. Goto the path E:\apps\OracleEPM\Middleware\EPMSystem11R1\products\Essbase\EssbaseClient\bin
  2. Right-click on ESSCMD.exe file and select Properties.
  3. You will notice your Essbase Client Product version in the properties tab.
Essbase Client MSI (EssbaseClient.exe) installation and version check
Method-2:
  1. Open a command prompt and navigate to the path E:\apps\OracleEPM\Middleware\EPMSystem11R1\products\Essbase\EssbaseClient\bin.
  2. Enter the command startMaxl.cmd
  3. In the output, you will notice your Essbase Client version i.e. 11.1.2.4.021
Essbase Client MSI (EssbaseClient.exe) installation and version check
That's all for this post.

I hope this article has helped you.
Your suggestions/feedback are most welcome.
Keep learning and Have a great day!!!
Read More